

How to set up a UniFi Talk softphoneComplete Setup Guide
Step-by-step from UniFi console setup and SIP registration to your first phone call. Detailed walkthrough for administrators and end users.
Scroll through the tutorial or click a step to jump directly:
Create SIP Device in UniFi Talk
Compatible with all UniFi Gateways (UDM Pro, SE, Cloud Gateway Ultra/Max etc.)
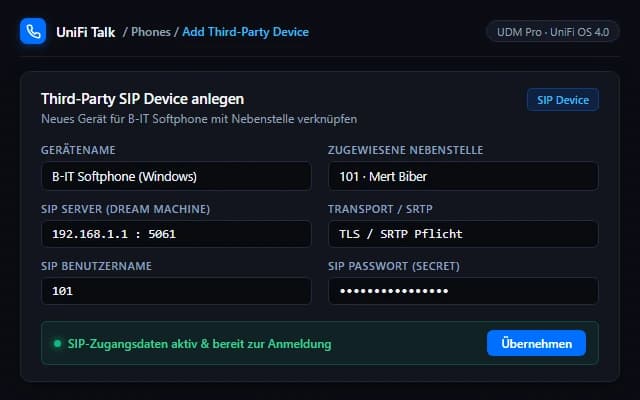
In the UniFi Talk web console, configure the softphone as a dedicated third-party SIP device to generate credentials and assign an internal extension.
Instructions & clicks:
- Log into your UniFi Gateway web interface (e.g. 192.168.1.1 or unifi.ui.com) and open UniFi Talk.
- Navigate to the „Phones“ section in the left menu.
- Click the blue „Add Third-Party Device“ button in the top right.
- Assign a descriptive device name (e.g. „Workstation Softphone“) and an internal extension (e.g. 101).
- Carefully copy the generated SIP username and password for step 03.
- Assign an outgoing caller ID number if you want to make external telephone calls.
For remote calling outside the office, connect via UniFi Teleport or WireGuard VPN. Alternatively, securely forward port 5061 (TLS) on your UniFi Gateway.
Install Softphone on Windows
Native 64-bit app for Windows 10 & 11 without requiring admin rights to run
Download the softphone and run the installer. The softphone requires zero administrative rights during everyday telephone operation.
Instructions & clicks:
- Download the latest version from our downloads page (EXE for single users, MSI for IT enterprise deployment).
- Double-click the installation package.
- Windows SmartScreen notice: If Windows displays an unknown publisher banner, click „More info“ and then „Run anyway“.
- The installer automatically registers system protocol handlers for tel: and sip: links.
- Upon completion, the softphone launches immediately with the first-run configuration wizard.
For silent enterprise deployment via Group Policy (GPO) or Intune, run the MSI with the '/quiet' parameter.
Enter Credentials & Test Connection
Secure TLS encryption (Port 5061) & Windows Credential Manager storage
Enter the credentials obtained from your UniFi console. The integrated connection test verifies gateway reachability and authentication before saving.
Instructions & clicks:
- Server / Gateway IP: Enter your UniFi Gateway local IP (e.g. 192.168.1.1 or hostname).
- Port: Port 5061 (TLS) is preconfigured for secure encryption, or port 5060 for unencrypted UDP.
- Username & Password: Paste the credentials generated in step 01 from UniFi Talk.
- Transport: Choose „TLS“ (recommended by UniFi Talk) or „UDP“.
- Click „Test Connection“: The wizard displays a green success confirmation („200 OK - Connected successfully“).
- Click „Next“ to store the credentials safely.
Your passwords are never stored in plaintext JSON or INI files. They are encrypted using Windows DPAPI in your personal user credential vault.
Connect Nextcloud / CardDAV Contacts
Two-way synchronization according to RFC 6352 with ETag conflict resolution
Integrate your contacts from Nextcloud, ownCloud, or Synology. Incoming callers will be immediately identified by name and company.
Instructions & clicks:
- In the wizard or under Settings, choose „Contacts“.
- Click „Add CardDAV Address Book“.
- Enter your server URL (typically: https://cloud.your-domain.com/remote.php/dav/).
- Enter your username and a dedicated Nextcloud app password.
- Select the target address book and assign a visual tag color.
- The softphone syncs contacts in the background and offers instant suggestions as you dial.
If your cloud account uses 2FA, generate an App Password under „Settings → Security → Devices & Sessions“ in Nextcloud.
Configure Headset & Audio Routing
Independent audio routing for call audio and desktop ringtones
Select your headset for voice calls and optionally assign desktop speakers as a secondary ringer so you never miss an incoming call.
Instructions & clicks:
- Open „Settings → Audio“.
- Playback Device: Choose your preferred headset (USB, Bluetooth, or 3.5mm jack).
- Ringtone Device: Optionally choose PC speakers so calls ring audibly even when the headset is resting on your desk.
- Recording Device: Select your headset microphone.
- Click „Play Test Tone“ to test speaker audio (440 Hz sine wave).
- Speak into the microphone: The live level indicator visualizes input volume in real time.
Plugging in a known USB headset automatically switches audio routing without interrupting active calls.
Ready: Dialing, Call Holding & Transfer
Click-to-dial, contact reverse lookup, call transfer, and recording
The softphone is fully ready. The green indicator indicates an active connection with your UniFi Gateway. You can start making calls immediately.
Instructions & clicks:
- Dial numbers: Type numbers via your physical keyboard or use the on-screen dial pad.
- Click-to-Dial: Click telephone numbers on web pages or CRM systems (tel: and sip: links) to dial instantly.
- Call control: Hold, transfer, mute, or swap lines with a single click in the UI.
- Call recording: Start local lossless stereo WAV recording directly to your hard drive whenever required.
- Do Not Disturb (DND): Toggle DND from the Windows system tray with one click during meetings.
Closing the window minimizes the application into the Windows system tray, conserving resources while keeping you reachable.
Frequently Asked Questions
General & Setup
Getting started, requirements & trial period
Do I need UniFi Talk?
Yes. The softphone is a SIP client for a system you already run and brings no telephony of its own. It is tested against UniFi Talk; other systems that allow third-party SIP usually work, but are not verified.
Does installation need administrator rights?
Installation does, like any Windows application. Registering for tel: and sip: links, by contrast, is written only for the signed-in user and needs no admin rights.
Compatibility & Privacy
Operating systems, cloud services, AI & security
Does it run on macOS or Linux?
Not at the moment. What ships are Windows installers as MSI and EXE.
Do I have to use Nextcloud?
No. Address books can live locally inside the softphone. CardDAV is an option. The sync is verified against Nextcloud.
What happens when the machine is offline?
The application keeps making calls as long as it can reach your phone system. The licence is re-checked regularly; if the licence server is unreachable it stays valid for another seven days. Only after that does the application speak up.
Troubleshooting & Practical Tips
Solutions for common questions and configuration gotchas
The status dot stays red (Registration failed).
Usually the transport port is mismatched. UniFi Talk defaults to TLS on port 5061; it may not answer on unencrypted UDP port 5060 depending on your gateway settings. Verify that the local IP of your UniFi Gateway (e.g. 192.168.1.1) is reachable from your PC.
I hear no sound or the other party cannot hear me.
Check Settings → Audio to make sure the correct microphone and speaker devices are selected. Run the 440 Hz test tone. In Windows privacy settings, ensure desktop apps are allowed microphone access.
Nextcloud contacts are not syncing.
The CardDAV address in Nextcloud typically ends in '/remote.php/dav/'. If your Nextcloud account is protected by two-factor authentication (2FA), create a dedicated app password under Settings → Security.
Calls drop after exactly 30 seconds.
A disconnect after 30 seconds indicates that the SIP ACK packet is blocked by NAT or local Windows firewall rules. Ensure the local SIP port is permitted in Windows Defender Firewall for both inbound and outbound traffic.
Which UniFi Gateways are supported?
All devices capable of running the official Ubiquiti UniFi Talk application. This includes: UniFi Dream Machine Pro (UDM-Pro), UniFi Dream Machine Special Edition (UDM-SE), UniFi Dream Wall, UniFi Cloud Gateway Ultra (UCG-Ultra), UniFi Cloud Gateway Max (UCG-Max), and Cloud Key Gen2 Plus.